Printable Gift & Goodie Bag Instructions
Since these printable bags are a bit more complex to put together than the other items here at Mint Printables, here's instructions to get your bags printed, folded and finished with glue.
Step 1: Check Printer Settings
If you're printing directly from the webpage, adjust your margin setting (there's instructions on that page for most major browsers). When you're done that come back and go to step 2.
If you choose to save the image, check that your printer settings won't cut off the edges by using Print Preview. (Sorry, I can't give instructions for that since each printer is set up totally differently.)
Step 2: Printing
Print out 2 copies for each Gift Bag you want to make. You can either use the same image twice if you want the front and the back the same, or if you're more adventurous, you can mix and match since I made all the images the same size. (Note, the borders on some are a different width, but the templates themselves are all the same measurements.
Step 3: Folding
To get really crisp fold lines, you may want to score the edges before folding, if you don't know how to do that, don't worry.. I sometimes skip that step myself ;)
Try to fold down the center of the lines. So you know what lines I mean, the image below shows a stripped down version of the bags:
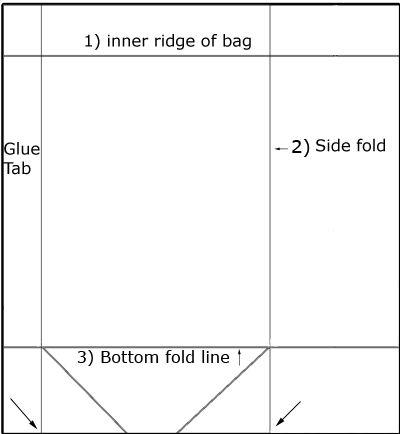
- Fold the inner ridge down towards the inside (unprinted side) of the bag.
- Fold the sides (both the glue tab and the right side) towards the inside of the bag.
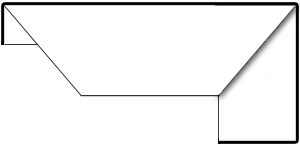
- Fold the bottom edge of the sides (the arrows in the image above are pointing to what I mean) inwards towards the "Bottom fold line". They fold underneath the newly created almost triangle, the shape I mean is shown in the image below. (This step is a bit hard to explain, but think of it like wrapping the ends of a gift.. it's the same fold.)
- Repeat folding steps 1 - 3 on the other page you printed.
- You should now have 2 pieces of the bag folded, the bottoms will look like this:
Step 4: Glue and Finishing Touches
- At this point the bag is mostly taken shape, now you just need to glue the "glue tab" to the inside of the other sheets right side, and glue the bottom tabs in place.
- Optional: Use a hole punch and make holes at the top, use yarn, ribbon, shoelace or whatever you like to make little handles.
- Optional: If you will be using this bag for anything of any much weight, you may want to reinforce the bottom and handles (if you added those) with a piece of cardboard. Just cut out a rectangle slightly smaller than the bottom of the bar, and place in inside the bag. If you added handles, you'll want to reinforce those as well. Same thing, just cut cardboard to the size of the "Inner ridge of bag", put the cardboard between the folds, then glue into place and add the ribbons or handles you chose.
- Fill with small gifts, treats or whatever you want and enjoy!
 Car Signs
 Pretty Lace Labels
 Baby Girls 1st Birthday
 Baby Boys 1st Birthday
 Printing Practice
 Reward Coupons
 Vintage Stationery